Google Login with OAuth2 in NativeScript
Do you need to include social authentication in your mobile apps? In this NativeScript tutorial, we're using OAuth2 and adding Google login…
Take control of your career. Build JavaScript mobile apps.
Do you need to include social authentication in your mobile apps? In this NativeScript tutorial, we're using OAuth2 and adding Google login to a simple app.
TL;DR
Here's a video version of this tutorial on my YouTube channel.
You can find a lot more NativeScript Tutorials on my YouTube channel: https://www.youtube.com/channel/UCajiMK_CY9icRhLepS8_3ug
Introduction
In this tutorial, we'll show you how to set up Google authentication in a NativeScript application. We'll be using the nativescript-oauth2 package, which is an OAuth2 authorization plugin for NativeScript.
Getting Started
We start with a simple app containing a single button:

<!-- main-page.xml -->

<Page xmlns="http://schemas.nativescript.org/tns.xsd" navigatingTo="navigatingTo" class="page">

  <StackLayout>
    <Button text="Login" tap="onLoginTap" class="btn btn-primary"/>
  </StackLayout>

</Page>
// main-page.ts
import { EventData } from "tns-core-modules/data/observable";
import { Page } from "tns-core-modules/ui/page";
import { HelloWorldModel } from "./main-view-model";
export function navigatingTo(args: EventData) {
const page = <Page>args.object;
page.bindingContext = new HelloWorldModel();
}
export function onLoginTap() {
// trigger our login
}Before proceeding, let's first install the plugin:
$ tns plugin add nativescript-oauth2Before the plugin can be used, you first need to configure it. Create a file named auth-service.ts and add the following to it:
// auth-service.ts

import { configureTnsOAuth, TnsOAuthClient, ITnsOAuthTokenResult } from "nativescript-oauth2";

import {
  TnsOaProvider,
  TnsOaProviderOptionsGoogle,
  TnsOaProviderGoogle
} from "nativescript-oauth2/providers";

let client: TnsOAuthClient = null;

export function configureOAuthProviders() {
  const googleProvider = configureOAuthProviderGoogle();
  configureTnsOAuth([googleProvider]);
}

function configureOAuthProviderGoogle() {
  const googleProviderOptions: TnsOaProviderOptionsGoogle = {
    openIdSupport: 'oid-full',
    clientId: '',
    redirectUri: '',
    urlScheme: '',
    scopes: ['email']
  };

  const googleProvider = new TnsOaProviderGoogle(googleProviderOptions);

  return googleProvider;
}

export function tnsOauthLogin(providerType) {
  client = new TnsOAuthClient(providerType);

  client.loginWithCompletion((tokenResult: ITnsOAuthTokenResult, error) => {
    if (error) {
      console.error('there was an error logging in.');
      console.error(error);
    } else {
      console.log('logged in sucessfully.');
      console.log(tokenResult);
    }
  });
}
In the code above, we configure the Google provider and pass it to configureTnsOAuth() which takes an array of providers and registers them as available for use. We'll talk more about the googleProviderOptions: TnsOaProviderOptionsGoogle later on and show you how to generate them.
tnsOauthLogin() will be called to log in the user (as a response to a tap event on a Login button). Here, we create a new instance of TnsOAuthClient and call loginWithCompletion() on the instance, passing in the provider we want to login with. The provider can be of type TnsOaProviderType, or it can be a string e.g. 'google', 'facebook', 'microsoft', etc. After login is done, the completion handler will be called with the results.
You have to register one or more auth providers to use with the nativescript-oauth2 plugin when the app starts. In the above code, we registered the Google provider. We execute this code by calling configureOAuthProviders() in app.ts before application.run() is called.
// app.ts

import * as application from "tns-core-modules/application";
import { configureOAuthProviders } from "./auth-service";

configureOAuthProviders();

application.run({ moduleName: "app-root" });
With that set up, let's now log in the user when they tap the Login button:
// main-page.ts

import { EventData } from "tns-core-modules/data/observable";
import { Page } from "tns-core-modules/ui/page";
import { HelloWorldModel } from "./main-view-model";
import { tnsOauthLogin } from "./auth-service";

export function navigatingTo(args: EventData) {
  const page = <Page>args.object;
  page.bindingContext = new HelloWorldModel();
}

export function onLoginTap() {
  // trigger our login
  tnsOauthLogin('google');
}
Provider Options
Before we can complete the login process, let's first revisit the code block shown below and take a look at what all those provider options are for.
const googleProviderOptions: TnsOaProviderOptionsGoogle = {
  openIdSupport: 'oid-full',
  clientId: '',
  redirectUri: '',
  urlScheme: '',
  scopes: ['email']
};
openIdSupport indicates whether the provider supports OpenId or not. Some providers are OpenId certified (e.g. Google and Microsoft) and so we use oid-full for them, others like Facebook don't support OpenId and for these, we would use oid-none.
We'll get the clientId, redirectUri and urlScheme after we register an app with Google. OpenId certified providers require authentication to be done via an out-of-app browser. For this to work, we need to register a custom URL scheme with the app (urlScheme) as well as supply a local redirect URI (redirectUri) to handle responses from Google's authorization server.
Scopes (scopes) enable your application to only request access to the resources that it needs while also enabling users to control the amount of access that they grant to your application. We ask the user for permission to view their email address.
Register an App with Google
To enable Google login, you need a developer account. If you have one, then head over to the developer console to register an application.
First, create a project by clicking on the Projects dropdown menu shown below and selecting Create Project on the window that pops up.

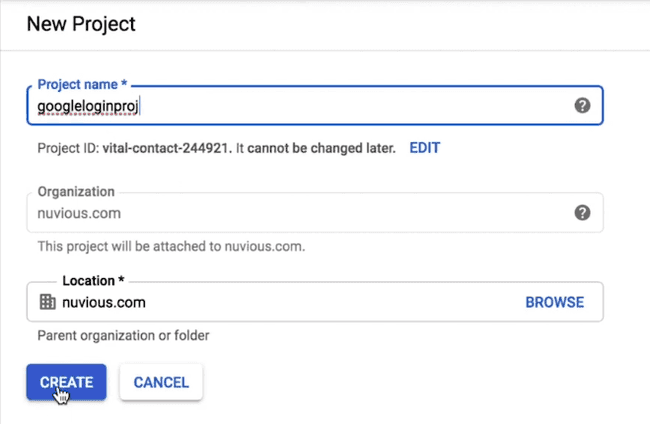
Give your project a name and then create it.

From the Projects dropdown menu, select your created project. Then select Credentials on the left panel. On the right panel, select OAuth client ID from the Create credentials dropdown menu. On the page that appears, click on Configure consent screen then fill in details regarding your application (at minimum, add the application's name).
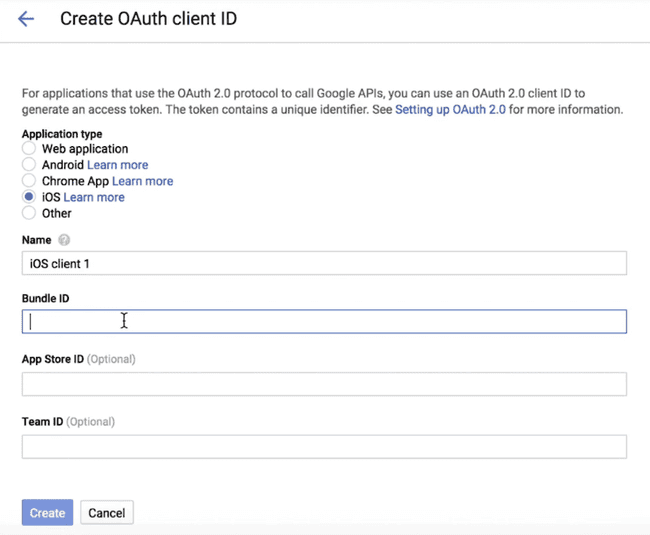
Next, create an OAuth client ID. Select iOS as the Application type, give it a name and add in your app's Bundle ID. Your app's Bundle Id can be seen in the package.json file. It is the id value of the nativescript object.

On clicking Create a client ID will be generated for you. Paste it into clientId of the googleProviderOptions object. For the urlScheme, you take the clientId and reverse it e.g. if the clientId was 43244757-fd8787df8a.apps.googleusercontent.com, then the urlScheme would be com.googleusercontent.apps.43244757-fd8787df8a. For the redirectUri, you add :/auth at the end of the urlScheme e.g. com.googleusercontent.apps.43244757-fd8787df8a:/auth.
As mentioned earlier, we need to register a custom URL scheme with the app so that the system knows which app to call after the user logs in using an out-of-app browser.
Registering a Custom URL Scheme on iOS
To register a custom URL scheme for iOS, open your iOS app resources, which are in app/App_Resources/iOS/Info.plist. In the key/value dictionary in this file, add a key for CFBundleURLTypes, if it's not already there, then add the value for that key as an array:
<key>CFBundleURLTypes</key>
<array>
  <dict>
    <key>CFBundleURLSchemes</key>
    <array>
      <string>com.googleusercontent.apps.43244757-fd8787df8a</string>
    </array>
  </dict>
</array>
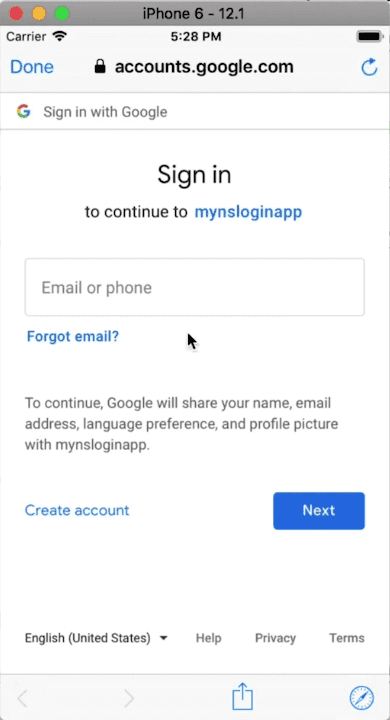
You can now run the app and test it out. On tapping the Login button, a browser will open up asking you to sign in via Google as well as let you know the information you will be allowing the app to access. After login, you will be taken back to the app and you will now be authenticated.

In our code, we logged out the tokenResult which is an ITnsOAuthTokenResult object that holds the authentication response from Google. If you take a look at your console, you will see the accessToken, refreshToken and idToken, which you can use to manage user sessions.
Registering a Custom URL Scheme on Android
To register a custom URL scheme for Android, open your Android app resources, which are in app/App_Resources/Android/src/main/AndroidManifest.xml.
Then, inside the activity, add a new <intent-filter> section with your custom URL scheme(s).
<intent-filter>
  <action android:name="android.intent.action.VIEW"/>
  <category android:name="android.intent.category.DEFAULT" />
  <category android:name="android.intent.category.BROWSABLE" />
  <!-- Custom URL Schemes -->
  <data android:path="/auth"
    android:scheme="com.googleusercontent.apps.43244757-fd8787df8a"/>
</intent-filter>
Now you should also be able to login with Google on Android.
We've covered how you can enable authentication via Google in your app. However, we haven't covered all there is to know about authentication, that will take more than a single article. If you want to dive deeper into security, we have a Securing NativeScript Applications course that covers protecting resources with authentication and authorization, keeping passwords safe with hashing and salting, JSON web token, server-side auth middleware, controlling the user login lifetime, etc.
Let me know what you thought of this tutorial on Twitter: @digitalix or leave a comment down below. You can also send me your NativeScript related questions that I can answer in video form. If I select your question to make a video answer, I'll send you swag. Use the #iScriptNative hashtag.


